Sunday, September 18, 2011

Coop from Hell...

So Lee and I hae been working on the coop since the begining of August. Many long hours, many late nights but we are almost done. We need nest boxes and to finish putting up OSB. Everytime we look at teh coop and run we find more things that need to be done. In the mean time...

A coat of paint was put on the barn before the shingles were put on.

Added the trim and a first section of shingles.

Lee hard at work.

Chicken Door.

Insulated and wired.

Light switch.

The light does work as does the socket.

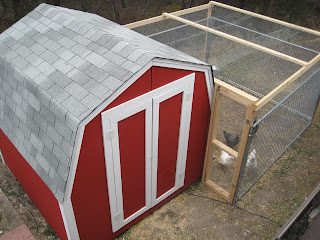
The doors are on, the run has a gate, the chickens are fenced in :)

the chicken door opens kinda like a draw bridge.

TURKEY!

The coop and run.

Inside the coop. OSB is partially up. Didn't want the chickens pecking at the vapor barrier and insulation.
It's been a long project, a ton of hard work but we are proud of our work!

Monday, August 8, 2011

Building the !#(*&_$ Coop!!!

So we've spent most (all but one day) of the last week building the mother flippin' coop! The plans beyond suck, we should have bought a table saw... and the darn thing just aint fitting together as it should! So instead of carrying on about it, here are the pics of the evolution.
The front of the "barn" minus the door. Some parts had to be cut after most of the front was done... took 3 days Wednesday Aug 3

Barn Shed brought to you in part Muscol! Every day of the week!


The back was so much easier since we had most of the measurments for the front Thursday Aug 4


And up go the side walls & back wall Saturday Aug 6

The front and ridgeboards are up, rafters are next Saturday Aug 6th

Rafters are in place, lets not talk about them Sat Aug 6th

Roof part 1 Sunday Aug 7

Roof part 2 and side walls... it's almost kinda done Sunday Aug 7
 it's been a long week, a very long week. Late starts, short materials, in need of tools, impossible angles... Had to cut boards at a 21 degree angle, with what exactly???? the Mitre saw doesn't cut angles that steep, using a skill saw or jig saw really bad idea!!!!! We got it done but not without much frustration. I have to say, the sander also came in to great use! Sure we are partially to blame for lack of experience but I'm also blaming warpped wood for straight cuts not fitting where they should!!!!

Tuesday, August 2, 2011

Coop Building Day One

Update Update Update!
There are a few things that occured since I last posted. We had originally decided to put the dog house together and use the 3 segments of roofing from the kennel as the enclosure. Well the plans didn't exactly work out...


Here's the chainlink/chicken wire fence segments

On July 1st I went to Home Hardware to purchase a "Barn Style" 8 X 8 Shed kit. The lady at home hardware is truly one of the worst employees I've ever encountered. She sold me the shed, no plans, I asked that the materials be delivered to the house and it was like I was asking for the moon. After some "discussion" she said it would be delivered on the Monday instead of that Saturday. The shed, well I should say the lumber was delivered, not where I asked for it to be put, no hardware and still no plans. The next day, Lee and I rushed to Home Hardware to get the plans and the hardware. The same lady argued with me that the hardware had been delivered. I think it was delivered that day.


The Shed...

Mid July we took a quick trip to Calgary we were in need of a few tools... Obviously. We got a smokin' deal on a DeWalt 12' Double Bevel Mitre Saw & Stand. We also bought a few "toys" for around the house. Lee and Danny set-up the saw


The Saw
For the last few days we've had the chickens out in the creates (minus the plastic bottom) They've grown fast in the last month...
Chickies

Chickies

It's been a hot weekend! Even the pups didn't have the energy to do much!

Day one... Building the frame and joists for the floor, placing the pavers... Starting way toooo late! ad the Home Hardware "detailed" plans for their Barn Style stick shed SUCK! They are not complete in any way, shape or form! We should sue them for false advertizing!!!! they only have the complete plans for how to build the floor and 2 side walls. Even their OWN builders said that they would never sell that shed! Nor could they provide any more detail. We will be posting the plans and  the cut list.measurements once we are done. Who cares what they say about copy right, I'll simply rename the project and add WAAAAAAAY more detail.


Placing the pavers


Cutting 2X4 (which by the way are really 1.5 X 4 )


Lee screwing in the frame for the floor

Yupp, almost level!


Ready for the plywood to complete the floor!

Well that's the update for day one. Day two and maybe three will be posted tomorrow.

Thursday, June 23, 2011

Peepers! Peepers!

It's been almost 2 weeks since I got the call...

Wednesday the 15th we went to Top Crop in Cranbrook, bought the waterer, the feeder box, pine shavings, feed (non medicated chick starter), a heat lamp and the bulbs. We thought the bulbs and balast were crazy expensive. We thought we'd check at Home Depot.

Saturday the 18th we went back to Cranbrook to catch a movie, I figured we'd stop at Home Depot first. Low and behold, they had the red heat lamp and the balast. We bought both for a third of the price that we'd paid at Top Crop. So we'll just return the over priced items.

Sunday June 19th, pick-up day! Went to Cranbrook first, had to return the unwated items, picked up a few things and headed to Fort Steele. Once we got to Fort Steele we gave Tyler a call to let him know that we were on site but that we wanted to walk around the site for a bit. So after a nice lunch at the International Hotel we called Tyler again so that we could meet up with him. We met Tyler at the barn next to the stables, he led us into the barn. Boy did we ever have one heck of a surprise! The week old little fuzz-butts I thought we were going to be picking up turned out to be 5 week old chicks! Fully feathered at that! The chicks were $8.50 each so 16 of them totaled $138.00. It was more than I had expected however, I was happy to pay a local historical town for these chicks. Not only were they local, 5 weeks old so less likely to die and they could be sexed a little easier. Our plan to put the chicks in a rubber maid bin was changed instantly. They graduated to the dogs crates! Never thought I'd use them again.

What an interesting few days it's been! The chicks are quite interactive! the first day, we checked on them a number of times in the first few hours, then we went a few hours checked on them one last time then it was bed time for us. The next morning, we checked on the chicks before work. They'd huddled up together to sleep, cleared out a bunch of pine shavings, filled the water dish with pine shavings and of course, added pine shavings to their food!


Chanteclec and Barred Plymouth Rock chicks


Today (June 22nd, 2011), I changed the chick water when I got home from work and one of the chicks "escaped". I took the opportunity to take her out side and let her roam around. At first I had her out on  by the dog kennel. Although she wasn't too nervous the pups were barking their heads off so I picked her up and we found a quiter location away from the dogs. She walked around, did the chicken scratch and ate her fill of bugs... I think there is a colony out there that's short a few ants....


Saturday, June 11, 2011

Chicks! already ???

I got a quite unexpected call this evening! My chicks will be available for pick-up on Sunday! I'm very excited!!! Lee and I have agreed on getting 8 Chanteclers and 8 Barred Plymouth Rock!! So we are going to Fort Steele to pick up the chicks on Sunday! I need a few things, a chick feeder, a waterer, and a brooder box. Then we need to build the coop!

Lee finally found us a trailer to borrow! so We'll pick up the trailer in the morning, head to Cranbrook, get our shed kit, stop in at Fort Steel, pick up the chicks and come home!!

Stay tuned for more and pics!

Sunday, May 15, 2011

Will this coop ever get built?

So a few weeks ago I went and had the materials for the coop quoted. The Invermere Home Hardward did a half butt job of pricing the materials. they came out to about 650.00$ but most of it wasn't priced. I had even brought the girl my "How to Build Chicken Coops For Dummies" so she had a list of everything I needed. Then later that day Lee and I went to Home Depot in Cranbrook. The lady there was very very nice, she took my book, priced everythign she could, then we walked around the warehouse so I could pick other materials that I needed, she priced those out as well. The Home Depot quote was almost a thousand dollars but THAT quote was actually accurate. Our final stop was Home Hardware in Cranbrook. Instead of haveing all the materials priced out again, what we did was look at a few sheds, there was one that is 8'X8' just like in the book. So we got a price for the unassembled shed kit 465$ all we need to do is go get the parts, and assemble it ourselves. The lumber isn't cut so we can make all the adjustments necessary to add nest boxes, insulate and add electricity... This is the otion we are going for. Later on I found out that Home Hardware in Invermere carries that same shed but for 130$ more. The Cranbrook HH also has 6'X100' sheep fencing at 150$ per roll! Not bad at all!

Been looking for a trailer for 2 weeks now. Apparently no one I know has one. A friend found one for us but unfortunately it's tooo small and we can't have anything over hanging as the tires get in the way.

I called Home Hardware in Invermere today to see if they would match the price of the shed in Cranbrook, and they won't. That's fine, I just won't buy ity there. I'd really like to get Lee and I a nice compound Mitre saw and a table saw. I think Lee will be asking the Helmers this week if they have a trailer we can borrow. Here's hoping they do.

Friday, April 29, 2011

Coop & Run Update

I ordered 2 books a couple weeks ago, Building Chicken Coops for dummies and Chicken Coops: 45 Building Plans for Housing Your Flock. Chicken Coops:45 is NOT at all what I thought it would be. Sure, there are 45 "plans" for coops but none of them suit my needs and the plans weren't that great either... Building Chicken Coops for Dummies on the other hand is awesome! it only provides 5 plans HOWEVER, those 5 plans are for back yard chicken coops! Not only that, the plans are complete, they give a breakdown of HOW to build the coop, a list of materials is also provided. I HIGHLY recommend the For Dummies books!

We also measured out the cement pad, it's 24'X24' square. So no what we are debating HOW we want to fence the Pad. Do we want to fence the entire thing or just a portion of it.

The coop I was looking at is a walk in coop that can accomodate up to 30 chickens. It would allow me to walk in, easily clean the coop, it would also be easy-ish to insulate, I could have a storage area. I could also have a little entrance way with double doors. This would  allow me to enter the coop without worry of chickens escaping. On these plans the there's an entrance door but there's also a small chicken door. I think I am going to make a large door and then incorporate the chicken door into it.

For now, that's it. I can't wait to start working on the coop! Still no idea where I am going to get my chickens...